In this Call of Duty Black Ops 4 Zombies IX Map Guide, we will guide you on different important tasks that you will need to perform in the IX map which will unlock many important features for you. IX is one of the maps included in the Zombies mode in Black Ops 4 which is based on a Egyptian arena.
We have curated this Call of Duty Black Ops 4 Zombies IX Map Guide for you in which we have detailed the complete walkthrough of important tasks such as finding the Mystery Box, Brazen Bull Part Locations and activating the Pack-a-Punch machine.
IX Guide – Call of Duty Black Ops 4 Zombies
Our Call of Duty Black Ops 4 Zombies IX Map Guide details everything that you need to know about the IX map in Zombies mode of Call of Duty Black Ops 4.
Brazen Bull Part Location
Brazen Bull is a very useful shield in the IX map. To build the shield, you will need to find three parts scattered around the map and then build the shield using a workbench. We have detailed the three parts and their spawn location below.
Shield
The Shield could be found in any of the following three locations. Its general location is the Odin Tower and it could be found on any of the three towers.
- Go to the Odin Tower perk machine and look for the shield in front of a wooden barrel. This is the top most floor of the tower
- There is a shield rack on the second floor of the tower, look for the shield there in the last row.
- The shield sometimes also spawns near a cage at the lowest floor of the tower.
Visor
You will find the Visor in the Ra Tower. It could spawn in three locations inside the Ra Altar Room on the top floor. Look at the following three possible spawn locations.
- Near the Ra perk machine
- Check under the M1897 Trebuchet buying location
- Opposite this wall buy between two pillars.
Blade
You will find the Blade in Zeus Tower. Check all three floors for the below possible spawn locations.
- At the top floor of Zeus Tower inside the Zeus Altar Rom. Head to the Zeus perk machine and look at the bottom of the statue to find it near the perk machine.
- Check the hands of the statue located on the second floor near the stairs.
- Head to the Bath House located on the first floor and it might be sitting on the altar near the stairs.
Once you have all the required parts to build the shield, head to the workbench located in The Pit to build the shield.
Upgrade Brazen Bull to Iron Bull
Once you have crafted the Brazen Bull, you can upgrade to its extreme form called Iron Bull. To upgrade to Iron Bull, you will again need to hunt for three more hidden parts. To begin the upgrade process, you will first need to find and hit three Bull Heads located in the Zeus Tower Altar.
Head to the room, find the three Bull Heads mentioned in the locations below and hit them with Brazen Bull’s fireballs. You will find the Bull Heads in the following three locations.
- Look to the opposite side of the Zeus perk machine above the purple banner and the wall buy.
- Look to the ceiling of the room. One Bull Head is located on one of the purple squares located in the roof.
- The Last Bull Head can be found on a pillar. To look for the right pillar, go to the entrance of the room from the stairs and look to the right side. The pillar in question is the one located on the second column from the left side. Once you have hit the Bull Head, its eyes will start glowing red so you will know that you have done it right.
For the next step, you need to find three invisible items which will allow you to upgrade the Brazen Bull. These items are really invisible and they are not seen or shown in your inventory or anything. For the first item, you must head to the basement and enter The Temple.
Inside the Temple, you will notice the large stone statue in the middle which is surrounded by many spikes. Look directly above this statue and you will notice that one of the tiles is sparkling. Shoot this tile and something will fall down. Pick this item up. Before you go to the next item, you will need to die and bleed out.
Die any way you want and bleed out. Once you respawn, you can continue your hunt to upgrade the Brazen Bull. Head to the Zeus Tower and from the entrance, you will see a statue directly across the entrance. Its head and arm will be broken and it will be sitting next to a statue of a man holding a spear.
Go to this statue and check the ground. The game will give you an option to pick something up. Pick it up. Once you have this item, die, bleed out and respawn again. Once you are back in action, you can now look for the third item. Head to the Fallen Hero Room and check the ground near the entrance. You will notice a puddle right by the entrance.
Look on the right side of this puddle and the game will yet give you another prompt to pick something up. Pick it up and you will receive the third part to make the upgrade to your Brazen Bull. Now head to a workbench and upgrade Brazen Bull to Iron Bull. The new shield will give a green hue and will be more powerful than the standard one.
Activating the Pack-a-Punch Machine
Similar to other maps, IX comes with its own Pack-a-Punch machine and you will need to upgrade it before using it to upgrade your weapons. On the IX map, you will be required to find and kill 4 champions scattered around the map and then mount their heads on spikes. We have detailed the locations of all champions below.
Champion # 1
The first champion is located in the Ra Altar Room. To get there, you can start in the arena head to Ra Tower entrance and then make your way to Ra Altar Room. Once there, you will find the gong there to ring and summon the champion. Defeat the champion and pick up his head.
Champion # 2
The second champion is located in the Danua Altar Room. You can get there directly from the Ra Altar room where you defeated your previous champion. Here you will find another gong. Ring it to summon the champion, defeat it and pick up its head. On to the next one.
Champion # 3
Your third champion is waiting for you in the Odin Altar Room. To head there from the Danu Altar Room, use the Danu Tower Entrance to reach the Danu Temple Arboretum. From there, use the Danu-Ra Temple Entrance to enter The Collapsed Tunnel. Use the Collapsed Tunnel to reach the Fallen Hero and from there The Pit.
From the Pit, you can enter Odin Tunnel and the make your way up to the Odin Altar Room using the stairs. It is the top most floor. Ring the gong to summon the champion, chop it down and take the head. On to the last one.
Champion # 4
The last champion is located in Zeus Altar Room. You can cross the bridge between the Odin Altar Room and the Zeus Altar Room to get there. Here you can find the gong behind the ship, next to the stairs leading down to summon the champion. Defeat the champion and collect its head.
Now that you have all four champions’ heads, you can activate the Pack-a-Punch machine. To do so, you must head to the Temple Room. From the Zeus Altar Room, make your way down to the Zeus Tower Bath House and enter The Crypts through Odin-Zeus Temple Entrance. Once inside the Crypts, make your way to the Flooded Crypt which will give you access to the Temple.
Inside the Temple, you will find four spikes in front of a pillar. Put the heads there and wait. The pillar will become the Pack-a-Punch machine giving you access to weapon upgrades.
Mystery Box Location
You will find the Mystery Box in the underground. As soon as the stage starts, make your way all the way to the underground. In the main chamber, you will see that a corridor is splitting off in two separate paths. Take the left one and you will easily spot the Mystery Box sitting on the floor next to a broken statue.
Unlock Death of Orion
You must have activated the Pack-a-Punch machine before you start with unlocking the Death of Orion. Once Pack-a-Punch is activated, you will need to build the Acid trap. To build the Acid Trap. Once the Acid Trap is built, all locations where you can mount it will be unlocked on your map.
You will need three parts to build the Acid Trap. Find the chains, gears and metal pot from the underground temple and one you have all three parts. Assemble them at a workbench to create the Acid Trap. For finding the Metal Pot, you must first complete three challenges.
Head to the spawn room and you will notice some banners on the wall which are rolled up with the help of ropes. Go to these banners and melee attack one of them to start a challenge. Complete three of them and you will get the metal pot and a bonus reward in the middle of the spawn room.
You next step after the Acid Trap is finding the Scorpion Key. To do so, you will need to head to Danu-Ra Temple Entrance. There, notice the passage blocked by a fence and a brazier down inside it. Shoot the brazier and it will fall down. Now go to the bridge connecting the Danu Tower and the Ra Tower.
Up the bridge, look down while facing the arena and you will notice a pointer made of fire. This will be pointing to one of four towers located in the map. That specific tower will have the Statue Head which you need for the Scorpion Key.
The four towers in the map are Ra Tower, Odin Tower, Zeus Tower and Danu Tower. Check which direction the arrow is pointing and make your way towards that specific tower. If its Ra Tower, the statue is located behind a fire brazier located in the corner. If its Odin Tower, look in under the giant cauldron for the statue.
If it is Zeus Tower, check the corners of the Bath area and finally if it is Danu Tower, check the water for the statue. Once you have acquired the Statue Head, build an Acid Trap, put it on a spot and place the Statue Head on the Acid Trap to melt it. It will reveal the Scorpion Key.
Now you need to find one last item, the Gold Vase. Gold Vase is given to you as a reward when you achieve Crowd Affinity twice in a row. You achieve Crowd Affinity by meleeing the rewards you earn after completing challenges. You will hear the crowd cheer louder and louder each time you do that and the symbol on the bottom-left of your screen will fill up.
Do that twice and you will hear a special sound. Once that happens, look at the ground around you and you will find the Gold Vase. Pick it up. Once you have it, you are ready to pick the Death of Orion. Head to the Arboretum which is located on the lower section of Tower of Danu. On the stairs, look for a tiny hole on the second tree between the stairs and the entrance.
Melee this tiny hole to insert the Scorpion Key here. Interact with it again to place the Gold Vase here as well. Acid will then start filling in the Gold Vase. Once it is full after a wave, come back and pick it up. Go to the Mystery Box and throw the acid on the box. The box will turn green and interacting with it at this point will give you the Death of Orion. You can upgrade it further at the Pack-a-Punch machine to upgrade it to Serket’s Kiss.
IX Arena Challenges
The map also features some really hard challenges if you are up for them. Before you begin this challenge, we recommend that you complete everything else explained above, have the best weapons and open all of the doors of the map so you can move around easily. Once you are ready for a challenge, head to the arena and cut any one of the ropes in the outer wall of the arena.
This will begin your first challenge and give you three objectives in the left side of the screen. You will need to complete the objectives to win a prize for each challenge. There are four challenges in total. Ra’s Challenge, Zeus’ Challenge, Danu’s Challenge and Odin’s Challenge.
We have detailed all four challenges below and how you can complete them.
Danu’s Challenge
Go to the Arena and start triggering challenges by cutting down the ropes. Once three challenges are complete, a bowl will spawn. Pick up the bowl and the Pack-a-Punch Pistol that spawns near it. Your next task is to lure a axe-wielding zombie and make it throw its axe on the pyre in the middle of the stage.
A small piece of wood will drop down. Pick it up and head to Odin Tower’s big cauldron. Drop the wood inside and complete at least three waves. During this wait, you can go back to the main Arena and ask one of your teammates to run through the flames and collect some negative affinity.
Having a red thumbs down meter will make the crowd throw stuff at you. Look through the stuff and pick up some shit. Literally, it will be poop. Now you need to head back to the location where the Pack-a-Punch machine is located. Once there, you must find a skill with a special marking. It will spawn in the following three locations.
- Check the walls near the stairs
- Check under the gold markings on the wall
- Check the stone pillar in the center
Once you find the skull, equip your special weapon and it will fall down. Pick it up. Find a skull grinder located in the Flooded Crypt. Grind the skull by placing the skull inside the grinder and shooting it with the Death of Orion three times. Once the skull is crushed, pick it up and go the Zeus’ Bath House. In there, you will find a large bow.
Place the poop, crush skull and the wood inside this bow. Interact with the bowl to make it mix all the ingredients together until it starts to smoke. Once your offering is ready, pick it up and head to Danu Tower Arboretum and put in on the ground. Complete three rounds and you will then see some green smoke.
Once the smoke starts appearing, fill up your ammo, elixirs and everything else. Upgrade your weapons to their maximum and then head to the offering. Once there, you will need to get a Firebomb kill on top of it. This will charge it up. Once it is done, equip your special weapon and stand on top of the offering to teleport to an unknown arena.
Here, you will notice a lot of red hives on the walls with a lot of zombies around you in the area. Keep shooting the hives and zombies until the hives explode. Keep doing it until a Max Ammo spawns. Grab it once it spawns and run to the top of the stairs. There you will see some more hives. Destroy all of them and reach the end to complete the Danu’s Challenge.
Ra’s Challenge
To complete Ra’s challenge, your goal is to find four bull-head icons and charge them up. You will find the bull-heads in different locations in each game. Possible spawn locations are explained below.
- Flooded Crypt
- In the Pit
- Burial Chamber in Ra Tower
- The Bridge leading to Zeus’ Temple
- Danu Tunnel
- Check behind the barrier in Danu Altar Room
- Above the gate in the Arena
- Check the leaves at the Odin-Zeus Temple Entrance
After arriving at the bull head, you must use Brazen Bull’s fire attack at the head. If done right, a powerful zombie will spawn that you must kill. Collect its soul. Find three more heads and kill three more such zombies to collect their souls.
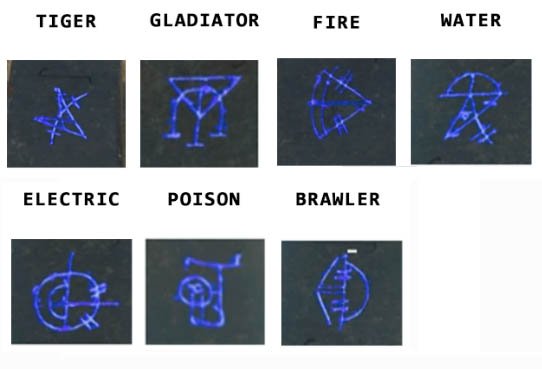
Once you have four souls, the Ra statue will automatically shoot a beam at the Obelisk. This will lock down the temple and four symbols will be shown to you when you interact with the Obelisk. You will need to kill the specific type of Zombies as shown in the order of the symbols. Check the image below for symbols and what type of zombie they represent. Image Courtesy: Reddit.
Kill these special zombies in the order listed according to your symbols. Kill all four zombies and return to the Obelisk to complete Ra’s Challenge.
Zeus’ Challenge
Next up is Zeus’ Challenge. In this challenge, you will need to find and raise four screws and shoot them in order to raise them up. You can find these in the following locations.
- Odin Tunnel
- Danu Tunnel
- The Collapsed Tunnel
- The Cursed Room
Once done, head to the Arena and get on the central platform. You will find some illuminated symbols there. If not, the screws are still missing. If they are, allow all members of the squad to get on the platform and interact with them at the same time. Next, go to the Pack-a-Punch machine nearby and interact with the machine until you get the Kilowatt upgrade. Get the upgrade and head to the arena.
Now you need to kill some zombies inside the electric circles with the Kilowatt to fill the rods up with their souls. Once a circle is fully charged, electricity will flow all around showing that the circle is complete. Once all are fully charged up, check the central pillar for four electric balls. Each player must take up position on each one of them and keep interacting with the balls to turn them red.
This is very easy if the party is full as one player can charge each ball. If there are less players on the team than the ones playing will need to manage the missing ones as well. Once all are charged, players will be teleported to an arena. Complete the challenge here and you will teleport back completing the Zeus’ challenge.
Odin’s Challenge
The final challenge is Odin’s Challenge. For this challenge, find three symbols located in the Danu’s Temple, The Pit and The Crypts and charge them up using Death of Orion or its upgrade the Serket’s Kiss. Keep shooting the symbols until they stay lit. This is a sign that you have done is correctly.
Finally, you will hear a voice and then you will need to make your way to the Pit. If it is not working for you, go back and try to charge the symbols again. Once the challenge is triggered in the Pit, a wave of zombies will attack. Kill them all and head to the grate. It will be filling up with water. Grab the key, kill all remaining zombies to complete the challenge.
Final Boss Fight
You are in for a big surprise when it comes to the boss fight of this level. Make sure that you have completed everything else, picked up the best weapons, upgrades, elixirs and everything else. Once you are all set, head to the Arena and interact with the big orb to start the final challenge of this map.
A large zombie wave will appear at this point. Keep thinning the horde until the boss breaks out from one of the doors. It will be a big zombie elephant which is armored to its last teeth and some enemies on top of it throwing spears on you. The elephant will charge at you; stomp you while the annoying enemies on top will rain down spears on you.
Focus on the elephant and try to shoot its vitals which are its heart and ribcage. Eventually its armor will break down and reveal the weak spot on its forehead. Keep shooting until it goes down and another elephant comes in the show which looks even more furious than the last one.
Repeat the same procedure as for the last one and it will go down eventually. Watch the ending cutscene for a big surprise and the level will be complete for you.
For more Call of Duty: Black Ops 4 Zombies coverage, check out our Call of Duty: Black Ops 4 Zombies Blood of the Dead Map Guide, Voyage of Despair Map Guide and Zombies Perks Guide.
This concludes our Call of Duty Black Ops 4 Zombies IX Map Guide. If you want to add anything to this guide, feel free to use the comments section below.


