


In this Days Gone Nero Checkpoints Locations Guide, we will detail all the locations of the Nero Checkpoints, and where you can find them. Nero Checkpoints are a part of World’s End mission, and completing all of them will unlock World’s End trophy/achievement.
Checkpoints are basically fast travel points when you complete them. Upon completion you can find one Nero Injector and one Nero Intel collectible inside each of the Nero Checkpoint. Nero Injector is used to max our your stats like stamina, focus and health.
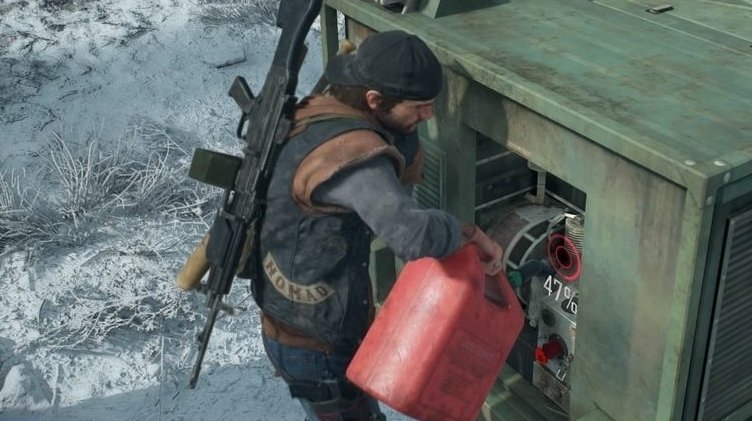
Nero Checkpoints require you fuel up and then power up the generator. This will ensure that the doors open for you to enter it, and take the items inside. There are always 2 fuel canisters in the Checkpoint area. Find any one and refuel the generator. When the doors open, you can enter the Nero building, and collect the Nero Recorder and Nero Injector.
Additionally, some generators require a fuse in order to power up, you can interact with the fuse box and follow the clues to be guided to the fuse location. In some occasions, you might have to repair the generators as well, costing you a little scrap.
Days Gone Nero Checkpoints Locations Guide
Below we have detailed all the locations of the Nero Checkpoints, where you can the fuel canisters to power up the generator, and have access to the Nero buildings.
Nero Checkpoint #1 – Little Bear Lake
This checkpoint can be found in the Cascade region, where it is also part of a story mission. You come across this Nero Checkpoint during the “Bugged the Hell Out” main story mission.
The generator of this Nero building will be right next to it, and you have to fuel it in order to be powered up. You can find one on the back of a repair truck here that will be parked at the end of the street. Once you have the fuel canister, bring it back to the generator, add the fuel and power it up.
This will open the doors of the Nero building. Go inside and interact with the big white box containing the Nero Injector. This will complete the checkpoint.
Nero checkpoint #2 – Old Pioneer Cemetery
This checkpoint can be found in the Cascade region, where you have to go to the Old Pioneer Cemetery. Once you reach the checkpoint, you will find a few Freakers guarding a fuel canister.
Kill the Freakers, and use the fuel canister on the generator that is next to the fence. Once the doors to the Nero building are open, head inside to get the Nero Injector and complete this checkpoint.
Nero Checkpoint #3 – Horse Lake
This checkpoint can be found in the Cascade region, where you need to go to Horse Lake. Once you reach this checkpoint, you will spot an SUV on the small hill next to the Nero Building.
You need to push this SUV until it rolls towards the Nero Building, making the roof of the building accessible. You can do this by first climbing on the car and then the roof. Its best to take cut out the loudspeakers on the roof, and then jump down the side where you can find the generator.
The fuel canister can be found outside the fence where SUV was. Fill up the generator to open the doors of the Nero Building, and collect the Nero Injector to complete this checkpoint.
Nero Checkpoint #4 – Iron Butte Pass
This checkpoint can be found in the Belknap region, where you need to go to the Iron Butte Pass. When you face the entrance of this Nero Building, coming from North, you will find the fuel canister on the far left side of the trash pile.
The generator in this checkpoint also requires to be repaired after refueling. Repairing will cost you a little scrap. Complete the checkpoint when you collect the Nero Injector.
Nero Checkpoint #5 – Marion Forks Tunnel
This checkpoint can also be found in the Belknap region, but now you have to go to Marion Forks Tunnel. To find the fuel canister here, you need to get on the back of a military truck that is facing the tunnel.
Fill up the fuel in the generator and then look for a fuse to fix the door panel. To do this, you will spot a blue search area on the mini-map. this will lead you to the broken door panel. Investigate it, and follow the tracks on the floor, as this will lead you towards a white container near the tunnel entrance, containing the fuse.
Fix the door panel, and once everything is done, completing the checkpoint by getting the Nero Injector.
Nero Checkpoint #6 – Old Sawmill
This checkpoint can be found in the Lost Lake region, where you need to go to the Old Sawmill. Once you are near the Nero building, you can find the fuel canister for the generator next to a tent that will be on the right side.
Take the fuel canister to the generator that will be right in the middle of the area next to a large rock. Once you power up the generator, head inside and collect the Nero injector to complete this checkpoint.
Nero Checkpoint #7 – Rogue Tunnel
This checkpoint can also be found in the Lost Lake region, where you have to head towards the Rogue Tunnel. To power up the generator, you need to find the fuel canister that will be on the back of an SUV next to the Nero building.
Take the fuel canister to the generator that will be to the opposite side of the building. Refuel it and power it up to open the doors of the Nero building. Once you have access to the building, get the Nero injector and the checkpoint will be complete.
Nero Checkpoint #8 – Santium Tunnel
This checkpoint is found in the Lost Lake region, where you need to go to the Santium Tunnel. Getting this checkpoint complete requires a few steps first.
Before you head in, you need to burn the infestation next in this area, which will be to the side of the dark tunnel. Inside the next will be a fuse that you need to use at the fuse box of the Nero building.
Now you need to get the fuel canister that in the tent, and take it to the generator that will be behind the Nero building, you will have to climb the building and then go to the back towards the generator. Power up the generator and head inside to collect the Nero injector.
Nero Checkpoint #9 – Volcanic Legacy Scenic Byway
This checkpoint can be found in the Crater Lake region, where you need to go to the Volcanic Legacy Scenic Byway. The generator is inside the fenced area next to the Nero building, while the fuel canister is behind the yellow school bus.
Power up the generator, head inside the building to collect the Nero Injector, and the checkpoint will be completed.
Nero Checkpoint #10 – Spruce Lake
This checkpoint can be found in the Crater Lake region as well, but you need to head towards the Spruce Lake. You can find two fuel canisters here, where one is in a tent when you enter the camp, or to the right side of the entrance.
You also need to find a fuse here, which you can do by following the clues leading you to the fuse that will be stored in a box up the hill. Place the fuse in the fuse box, and power up the generator to get inside the Nero building. Once you have the Nero Injector, the checkpoint will be complete.
Nero Checkpoint #11 – Chemult Community College
This checkpoint is in the Highway 97 region, where you need to go to the Chemult Community College. This area is locked to a main story, so when you have access to this when you progress in the story, go for the checkpoint.
This checkpoint require both fuel and fuse. The fuse can be found in one of the tents, and you can get it by following clues leading to the box. The fuel canister is under a wooden roof straight in front of the Nero Building.
Once you have power up the generator and fixed the fuse, head inside and complete the checkpoint.
Nero Checkpoint #12 – Pillette Bridge
This checkpoint is also in the Highway 97 region, where you need to go to the Pillette Bridge. When you enter the this area, you can find the fuel canister behind the little security checkpoint building right at the entrance. The generator though will be behind the Nero building.
The generator will be inside a fenced area so you have to run around the fence to reach it. fuel it up, power it on and the Nero building will be accessible. Complete the checkpoint after you get the Nero Injector.
Read more Days Gone guides:
This concludes our Days Gone Nero Checkpoints Locations Guide. Feel free to comment below.


This is the last mission that I need in order to complete 100 % of the game. Here is the problem-
After I enter the room where the nest was there is no fuse inside the box. The box is open …. What can I do?